
It’s always fun to build a balanced workout with a variety of movements depending on what your cardio focus is. Most people may go from extreme sitting in an office setting to an intense exercise causing their body to ache or get a muscle strain. Ouch!
Set your mind and body up for success by incorporating these yoga moves into your daily routine.
These yoga poses are about finding the balance to help you continue to do what you love and enjoy… without the body aches or unnecessary pain.
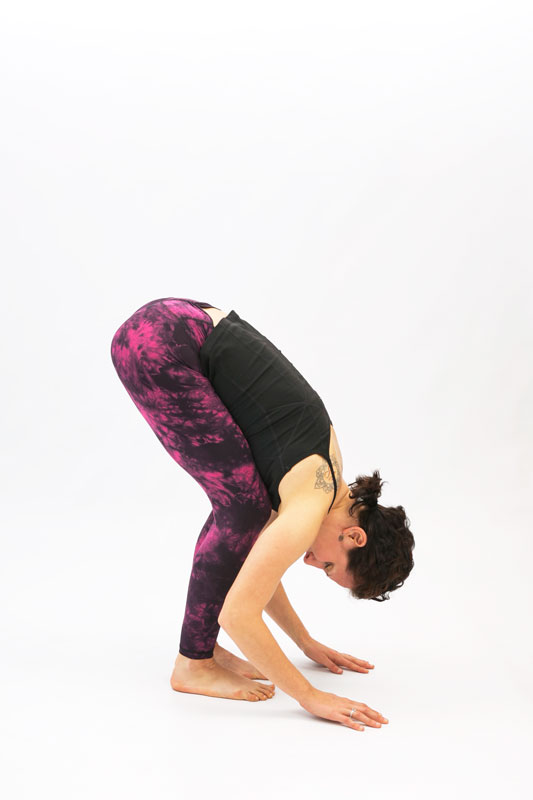
Move #1: Bowing Warrior (Hamstring Stretch)

The best way to work your hamstrings in a fun dynamic way. This move gives relief to the backs of the legs, sacrum and lower back that often tightens up after a round of cardio.
- From a standing position casually step back and step your feet a hips width apart.
- Line up the outer edges of your feet with the outer edges of the mat (double check).
- Place your fingers in the folds of the hips as you square them.
- Firmly plant the front foot not to rock, lift or curl the foot when you begin to move.
- Exhale and begin the hinge from the hips (no rounding in the spine) as you simultaneously bend the back knee.
- Use your hands to draw the hip of the front leg back to increase the stretch along the back of the front leg into the buttocks and possibly the lower back
- Keeping the belly strong, exhale, like a forklift and draw your body back up hugging the inner thighs and assisting with the core.
- Repeat slowly and mindfully 10 times on each side.
Move #2: Core Care Rolling Forward Bend


Who doesn’t like core-work? If you are a cyclist or in need of combating a tight front body… Good news! The extension works your core ten times more effectively than flexion. And this fun move will help you liberate your tight spots! Powerfully release your spine and hip flexors as you fully engage your core from the inside out!
- Find a comfortable hips distance footing.
- Exhale, bend the knees and “fall” into a forward bend with soft (even bent) knees.
- Inhale with bent knees begin to roll up the body focusing on getting your pelvis underneath you and then stacking the spine as you rise.
- Keeping your knees bent, before the head and shoulders stack, start to glide the pelvis forward.
- Imagine the pubic bone hitting a wall to open the hip flexors and extend your spine.
- With the arms extending alongside the ears you should feel the core quiver (earthquake) and turn on as you open the entire front line of the body.
- Exhale, bend the knees a bit more and roll back down into a soft flowing forward bend.
- Repeat this rolling sequence 5 to 10 times.
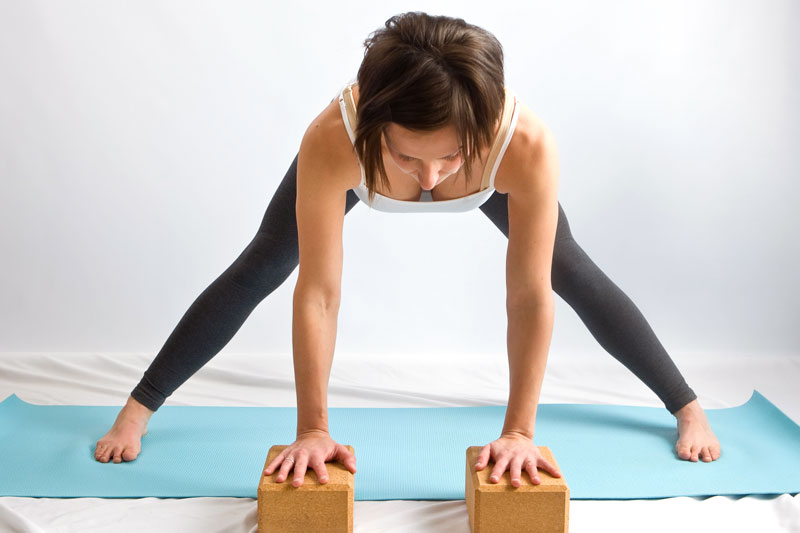
Move #3: Sinking Runners Lunge
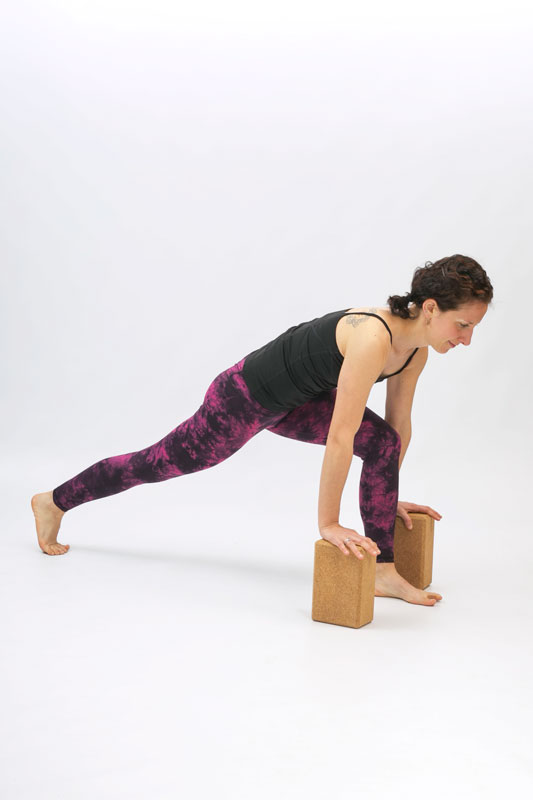

Psoas tightness is a chronic issue and if you are someone who goes from sitting all day to running or biking, you may be finding more pain than gain. Liberate the psoas to help aid the lower back and dissolve possible knee pain and possibly shoulder pain (as the psoas can pull down the shoulder).
- From a runners lunge (low lunge) with the feet hips width and fingertips on the highest level of the block (option to use stools or chairs).
- Square the hips forward, tucking the glute of the front leg underneath the body for more stability and a better stretch.
- Keeping the spine long, exhale and begin to sink the hip of the back leg down, pressing long through the back heel and up through the crown of the head.
- Inhale and rise back up to a comfortable lunge.
- Continue this dynamic movement and imagine you were sinking into a front pocket of your jeans. Try finding the areas you normally don’t automatically default to. Try to find the areas that are, otherwise, avoided and sink there.
- If the stretch is too intense, just focus on sinking into the hip and let up on extending up through the crown of the head.
- Repeat this dynamic movement 10 times, stepping up into standing forward bend in-between.
Move #4 Psoas Release
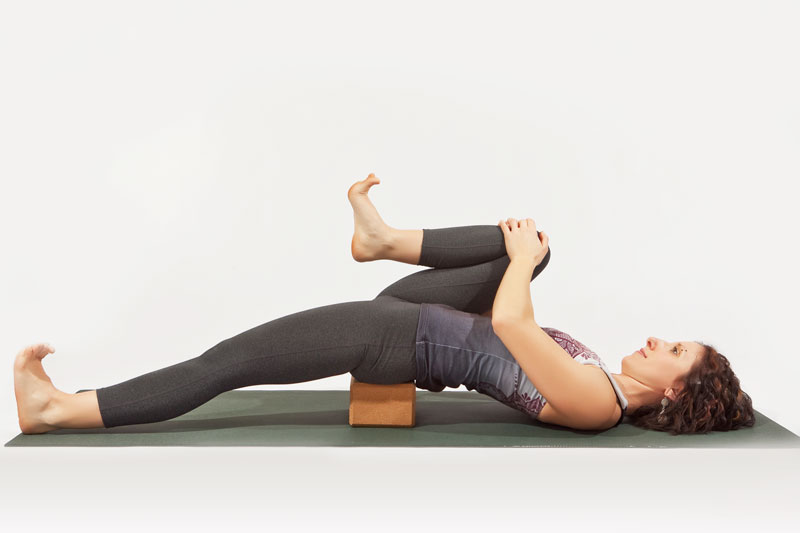
- Lying down supine on the mat place a yoga block underneath the sacrum (or just lay flat).
- Slowly begin to extend one leg out, down and away from the body like pushing your heel through sand (do not worry if the leg does not go straight).
- Breathing calmly slowly begin to draw the opposite knee in towards the abdomen.
- Do not aggressively pull the bent knee in. Slowly and mindfully draw the knee into the place where you first feel a stretch, when that sensation passes, draw the knee in a bit closer.
- Work through this process one layer of tension at a time as you continue to reach out, down and away through the heel of the straight leg.
- To be effective with the psoas hold this pose for 3-5 minutes.
- If you feel the stretch in the lower back, remove the block.
- If unable to clasp the bent knee, use a strap to hold the leg, or place a block under the bent knee’s foot. The tighter the psoas the more likely you may need head support.
- Repeat the opposite side.
Move #5 Happy Baby Play
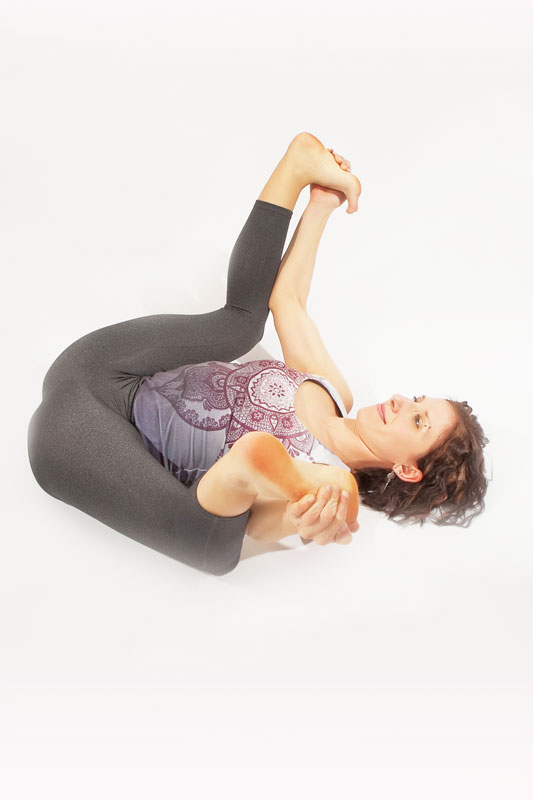

A happy pelvic floor requires that it be elastic like, mobile and strong. Pelvic floorwork isn’t just about strengthening it. For many, there is a lack of mobility (which is also connected to low hip flexibility). Release the pelvic floor, inner groin and adductors, sacrum, and tailbone surrounding in one fun move! Cardio often brings strength and tightness to the hips and pelvic floor. Let Happy Baby balance it all out! Great dynamic play for an otherwise congested body part.
- Lying on your back, hug your knees into your chest.
- Begin by grabbing for your feet (from the outside or inside) and start to draw the heels up to hover above the knees.
- If unable to clasp feet and keep the spine and neck long and comfortable on the floor, prop the head/shoulders and use a strap for both feet to help hold the foot more comfortably.
- Breathing calmly, press the thighs towards the floor as you simultaneously work to uncurl the tailbone towards the floor (great sitting bone attachment release).
- Begin to play with your happy baby drawing the heels in towards the navel or out into a straddle.
- Try moving one leg at a time or both together.
- Notice if the hips curl up off the mat, and play with pressing them down to enhance the pelvic attachment stretching.
- Play in Happy Baby for at least 10 breaths to really benefit from the pose.
Move #6 Sliding Side Lunge

All that stepping, sliding, moving and lunging can create some lines of tension or restriction from foot to hip. Wring out your lower body and leave yourself with happy hips. This is a perfect pose to do between cardio segments or as a great cool down.
- Begin in a wide straddle with the feet in a parallel position, firmly planted into the mat.
- Inhale rise up to the fingertips, and extend the spine out from the hips.
- With a strong belly and long lower back exhale and begin to bend one knee and slide your body towards that leg.
- Use your elbow, shoulder or tricep and press into the inner leg to help open the hip.
- Do not lift the heel of the bent leg or roll into the arch of the straight leg.
- Stay plugged into the feet and engage the quad of the straight leg to help direct the stretch along the inner thigh.
- Hold the side lunge for 5 – 10 breaths before you return back to center and repeat on the opposite side.
- If your fingertips do not comfortably, reach the ground, use blocks to assist.
Move #7 Stretch It Out Side Bend


Think about the direction your cardio is taking you in? Much of what we do is forward moving (Sagittal Plane). It is vital that we change up our movement patterns and move in other planes of motion to help reduce pain and tension patterns. Here take a seat after your workout and release your side body from hip to shoulder. All that sticky fascia under your arms will surely get the acknowledgment it deserves.
- Take a seat on a chair (preferably with no sides).
- Open your legs wide to expose the edges of the chair (if able).
- If your feet do not comfortably, reach the floor, place blocks under your feet.
- Grab hold of the opposite side of the chair with one hand (think right hand to the left side).
- Gently rotate your body in the same direction (towards clasping hand).
- Extend your free arm up alongside the ear, with the palm and elbow fold facing your head (think external rotation at the shoulder)
- Inhale deeply, and now exhale and begin to side bend feeling the clasped arm’s shoulder roll more deeply into the slight rotation.
- Relax the shoulders, and anchor the hips.
- Keep breathing and work to hold this pose for up to 10 breaths.
- To come out, roll your body to the center of the chair and relax for a moment before you roll up and repeat the opposite side.
Remember, finding balance is possible. For more breath, body, belief exercises. Check out hopezvara.com.